Repair the cracks and gaps in your concrete sidewalk with this step-by-step guide.
Cracks in your sidewalk not only look bad, but they can also cause your slabs to settle over time as water seeps down and erodes away what’s underneath. Eventually, these sidewalk cracks and gaps can turn into big trip hazards.
Fortunately, with some basic tools and a little know-how, you can repair these cracks yourself, restoring both the look and safety of your walkway.
This guide will walk you through how to fix sidewalk cracks, including a materials list and some tips to get the best result. Whether you’re a seasoned DIYer or a weekend warrior, you’ll find the steps easy to follow.
However, if you’d like to leave crack repair up to the professionals, A-1 Concrete Leveling can help. Learn more about professional concrete caulking services here.
Tools and Materials Needed for Repairing Sidewalk Cracks
-
Concrete Caulk
You’ll need a flexible caulk designed for joint and crack sealing. Polyurethane is the most common, but some newer hybrid polyurethane caulks are gaining popularity due to their advanced moisture and UV tolerance.
Caulking products are also formulated as either self-leveling or non-sag, and both types work well for sidewalks. Brands like Chemlink and Sika are good options.
Pro Tip: Self-leveling caulk is thin and runny, while non-sag caulk is thicker and holds its shape. You can seal off the edges of a crack with non-sag caulk and apply self-leveling caulk to the crack itself to avoid having to smooth out all the caulk manually.
-
Caulk Gun
Having a caulk gun ensures an efficient and even distribution of caulk. Be sure that you have the right size caulk gun for your caulk tubes.
-
Backer Rod
For wider and deeper cracks, backer rod can be used to fill the crack and reduce the amount of caulk needed. Most caulking is intended to be no more than ½ inch thick, so the backer rod helps ensure you can create the desired size/shape for your caulking.
Sand can also be used to fill the cracks instead of backer rod, but it can also be more difficult to manage.
-
Pressure Washer, Grinder, or Wire Brush
The cracks have to be cleaned out to ensure the caulk adheres to the crack, and a pressure washer, grinder, or wire brush can come in handy for this part.
The grinder can be especially important for narrow cracks to allow you space to get the caulking down into the crack.
-
Spray Bottle with Soapy Water
Spraying the caulking with soapy water helps you smooth it out and get a nice finish.
-
Dry Sand
Dry sand that closely matches the color of your concrete can be applied to the caulk to help the crack repair blend in.
Step-by-Step Guide to Repairing Sidewalk Cracks and Joints

1. Prepare the Sidewalk and Clean the Cracks
Begin by removing debris and dirt from the cracks using a pressure washer, grinder, or wire brush. Ensure the sidewalk is dry before proceeding.
Pro Tip: If the sidewalk slabs have settled and caused trip hazards, consider leveling them first to align the edges of the cracks.
This will make the crack repair more durable, safer, and look better. Also, if you decide to level the slabs later, the caulk job will likely be ruined during the lift.

2. Install the Backer Rod
Backer rod is recommended for cracks wider than ½ inch and deeper than 1 inch. The backer rod should be slightly larger in diameter than the crack itself.
Press the backer rod into the crack, about ½ inch below the surface.
You can also use playground sand in place of backer rod. Fill the crack with sand until all voids are filled and the sand is ½” below the surface. Tap the concrete gently with a 2x4 to make sure the sand is distributed evenly.

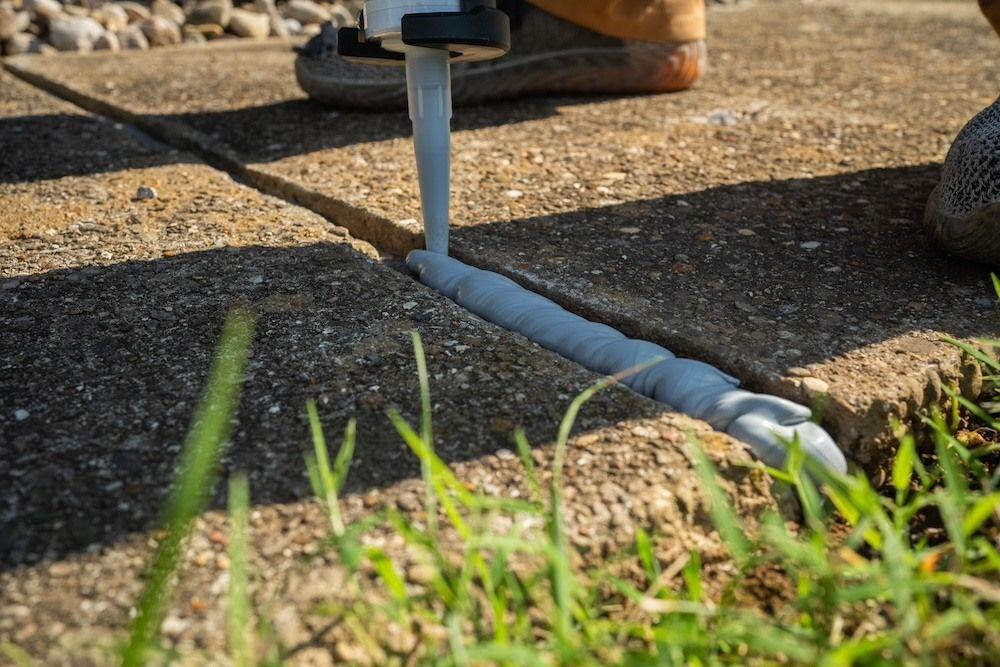
3. Apply the Caulk
Cut the tip of the caulk tube at an angle, similar in size to the width of the crack. Starting at one end, squeeze a consistent bead of caulk along the crack.
If using self-leveling caulk, block the ends of the crack with non-sag caulk to prevent it from flowing out. Be aware that small gaps in your backer rod may also allow the caulking to flow down, and in these cases you can also use a non-sag caulking to close up that gap before applying your self-leveling caulk.

4. Smooth and Finish the Caulk
If using non-sag caulk, quickly smooth the caulk with soapy water before it begins to set. Wet your finger or a smooth tool (a spoon works well here!) and glide it over the caulk to press it into the crack and smooth the surface.
Avoid spreading the caulk outside of the crack and onto the surrounding sidewalk, as it can be hard to clean off and make the repair look messy.

5. Add Sand To Blend
While an optional step, adding dry sand that closely matches the color and texture of your sidewalk will help the caulk blend in.

6. Allow the Caulk to Set
Follow the caulk manufacturer's instructions for curing time. Avoid foot traffic on the repaired section of the sidewalk until the caulk has fully set.
Tips for a Durable Sidewalk Crack Repair
-
Lift Slabs Before Caulking
If you have trip hazards or uneven slabs, the proper order of operations is to lift the settled concrete before caulking gaps and cracks. If you wait until after you repair cracks to level the sidewalk, the crack repair will likely get ruined.
-
Apply Concrete Sealer
Once the caulk has cured, applying a concrete sealer over the sidewalk will help protect the concrete from water penetration and weather damage.
-
Consider Professional Help
Repairing sidewalk cracks is totally doable as a DIY project, but getting caulk to lay down smoothly and look the way you want it to is an acquired skill. If the visual results of your sidewalk repair are a priority, then it might be worth it to spend the extra amount to hire experts.
Maintaining Your Sidewalk After Repair
Regular inspection and concrete maintenance can prevent minor issues from becoming major problems. Keep the area clean, remove weeds, and apply a high-quality penetrating concrete sealer to keep your sidewalk in good condition.
No caulking lasts forever, so it's important to check your caulking repairs over time and do touch-up repairs or replace the caulk if you see it begin to separate from the concrete.
Should You Repair Your Concrete Sidewalk Cracks?
Repairing sidewalk cracks might seem daunting, but with the right tools and techniques, it’s a manageable project that can greatly improve the safety and appearance of your property.
Remember, if the sidewalk has settled or the damage is extensive, it might be wise to consult a professional.
A-1 Concrete Leveling has been repairing concrete nationwide for over 30 years and can help with anything from cracked sidewalks to sunken basement floors. Find your nearest location to request a free onsite cost estimate with a member of the A-1 team!
But if you’re ready to take on repairing sidewalk cracks yourself, grab your tools and take the first step towards a safer, better looking sidewalk today!
Topics: